
5 tips on how to film a good dev diary
Recently, we talked about dev diaries in the Jaleoblog and gave you some tips and tricks on how to approach them. As we promised, we’re back at this topic to offer some advice on how to shoot a good dev diary on a budget. For the purpose of this post, we’ve set an upper spending limit of €150. Yes, you can make a dev diary for less than €150! It’s possible to make it even cheaper if you already have some of this gear, or if you can replace it with what you have at home or at your office (we’ll expand on this later).
However, let’s not fool ourselves: if you want really good results you should hire a professional – video filming and editing is a true art, and it takes years of expertise (as well as some very expensive gear) to get a really good product. For obvious reasons that can be expensive, especially for a small indie studio… In no way we are implying that you can do for €150 something that can replace a professional’s work… but that doesn’t mean that you can’t make something good enough, if not to be broadcast on television, at least to present yourselves and your project and reach out to your online community.
Alright, let’s go: here you have 5 tips on how to make a good dev diary for less than €150!
1. Take the camera out of your pocket
Captain Obvious at the keyboard: the very first thing you need to shoot an interview is a camera. If you or someone from your team has a DSLR camera with video-filming features, it’s your lucky day: you can get astounding results with even a basic DSLR camera. Ideally, you would use a lens with a shallow depth of field that highlights the main subject of the shot – but DSLR cameras and good lenses are way above the €150 limit we’ve set, so unless you already have one in the team, this is out of the question.
Do not despair, though: we all have a good camera in our pocket, a much better one than amateur filmmakers would have dreamt some years ago. Yeah, we’re talking about your smartphone. Any high-end smartphone, like an iPhone, Google Pixel or Samsung Galaxy, carry very good lenses capable of shooting very nice video. Even mid and low-end smartphones can give you something passable as long as you light the scene properly (we’ll talk about that later). Surely someone in your team has a good smartphone you can use. Problem one, solved!
Next, you will need a good video camera app. The native camera of a smartphone tends to be 100% automatic, and it will be useful for you to fine-tune things like focus, white-balance, etc. Apps like Moviepro (€5.99) or Filmic Pro (€16.99) will do the trick. Filmic Pro is probably the best one, but you need to know some concepts of photography and filmmaking to get the most out of it. Another thing you will need is a tripod. You can find tripods for smartphones for around 20€. It won’t be exactly super stable, but you’ll shoot this in a controlled environment anyway. Just make sure no one bumps into it!
2. Good audio goes a long way
Funny enough, in a video sometimes audio is even more important than image. Look at some of the most important youtubers and streamers: too close shots, dull backgrounds… but their voice is crisp clear. Even if you can’t get everything right when filming video, if your voice sounds rich and clear it might do the trick – after all people won’t be watching it in a high-end TV but in a window in their computers or in the small screen of their smartphone.
The smartphone you’re using to capture the video won’t be enough for this, though. It’s not because its microphone won’t be good enough – it would be just too far from the subject of the video to not to capture the reflections of the sound in the room or some ambient noise. Luckily, there are cheap lavalier microphones that can get great results for its cost – for instance, the Rode Smartlav mic costs around €45 and it’s wonderful for interviews. Some post-production treatment is recommended to improve it, but even at its most basic form, this mic can definitely do the trick. Check here if your smartphone is compatible, mind you!
Even if you can put the camera close enough to connect the microphone directly to it, we strongly recommend you use a second smartphone to capture the audio. Yes, that means you will have to put everything together later when you edit the video – but also that you won’t break anything if you move just a little bit or turn your head too fast!
3. Set the scene
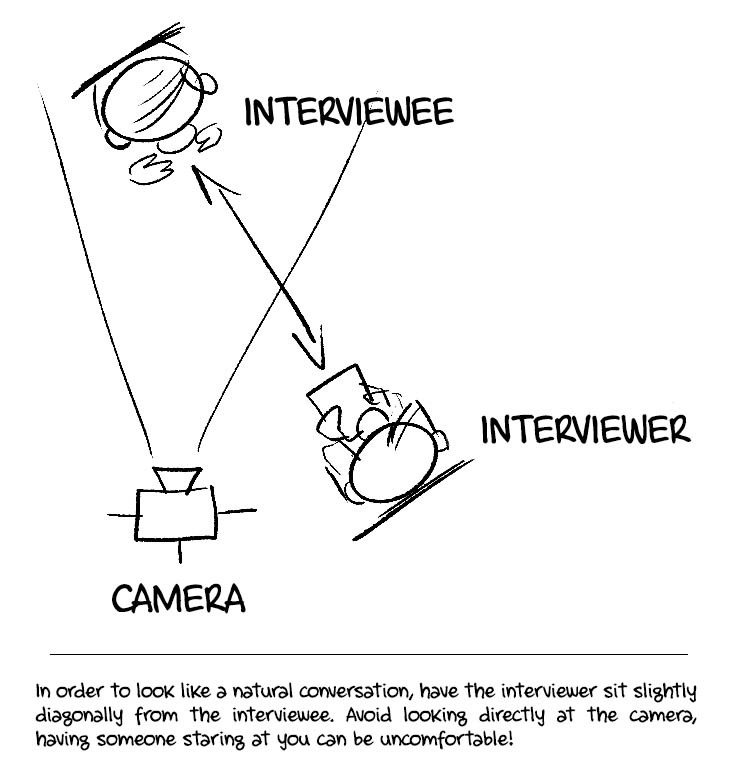
We start with the tricky parts here. You have to set the scene to get the shot you want. It’s helpful to think of the dev diary like an interview: you’re telling a story that answers to some questions that should be interesting to your community, even if these questions are implicit. One of you should play the role of the interviewer, even if it’s just so the interviewee has someone to talk to. It feels super weird to talk to empty space – you don’t know where to fix your eyes so, in the end, you look like a loony talking with their imaginary friends. Having this in mind, you can set the scene to look like this:
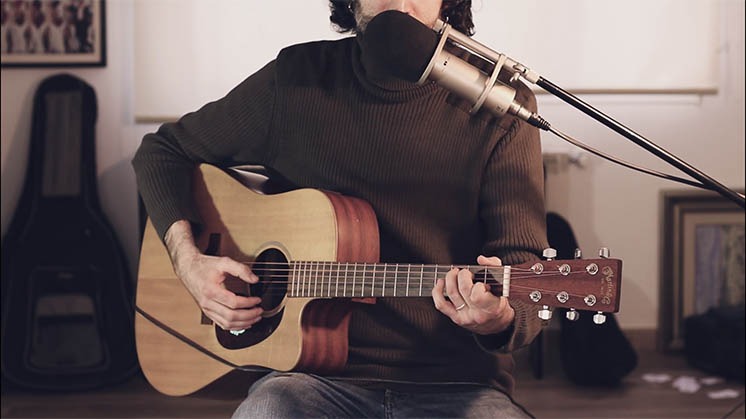
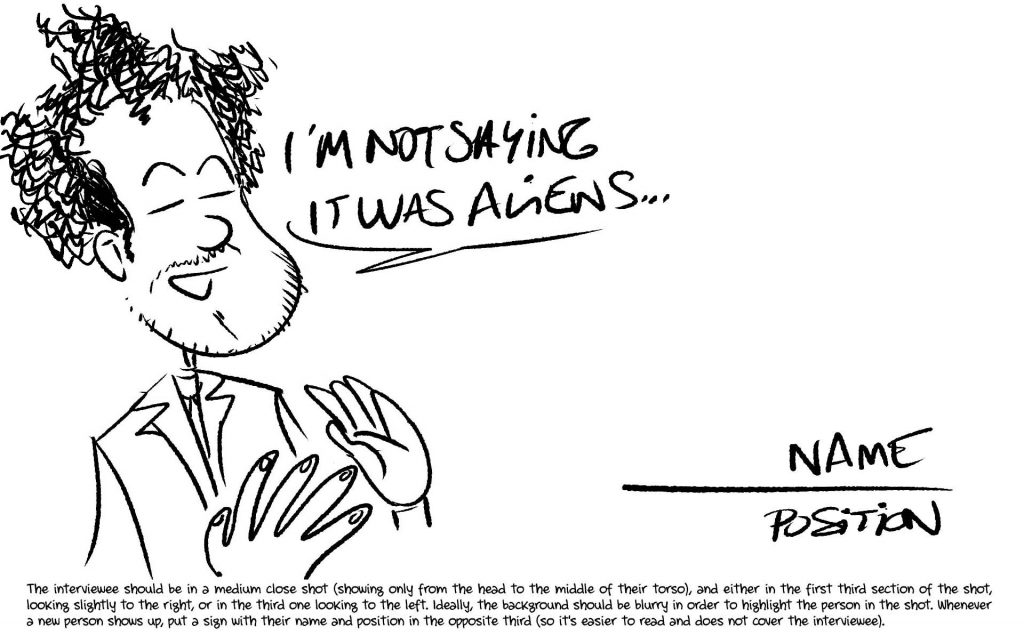
Ideally, it should be filmed with a shallow depth of field so the background is a bit blurry, which makes the subject really stand out – but that’s tricky to do with a smartphone. You should be a bit far from the background to get it, and it’s likely that your office or wherever you film all this won’t be big enough for this… Worst case scenario, try to find a background that does not distract the viewer from the subject. This is the kind of shot you’re trying to achieve:
4. Light the scene
Next thing you should consider is lighting. When a video has enough light you can make it look darker in post-production if you want to – but there’s no way to fix a too-dark video. If you don’t want to bother too much about this, just film everything in a place with good natural light. Just make sure the light does not change too much – avoid overcast or rainy days, shooting too close to dusk or dawn… if you have to, just call it a day and resume the shooting until the next day when the light is the same.
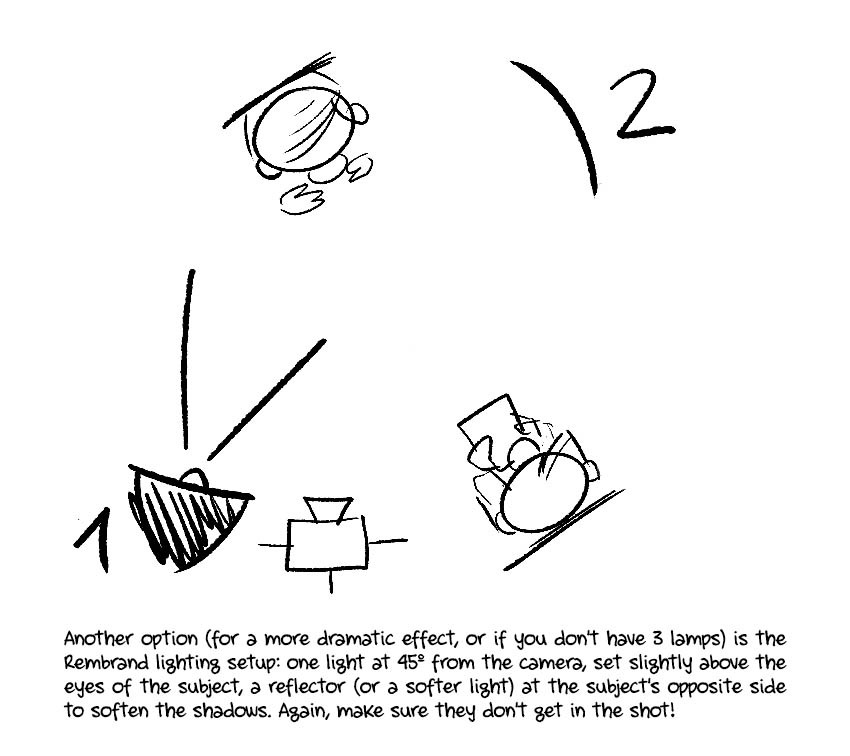
However, if you don’t have any well-lit place available, or you want to do it in your office and it’s a bit on the Dark Side, you will need some artificial lighting. You can buy a lighting kit with three lamps for less than €50; a reflector will cost around €10 more. However, some floor lamps might do the trick if they’re potent enough – especially if you can put a makeshift reflector around them to direct the light (this is why we said that the total budget can be even lower than €150).
Now, a warning: proper filmmaking lighting is really complex, an art by itself. You can convey lots of emotions and visual textures through illumination, but you’ll need a professional for that. This is… well, a patch, the bare minimum, something really simple that will at least make the subject of the video stand out a little bit from the background and not look like a B-movie villain creeping in the shadows.
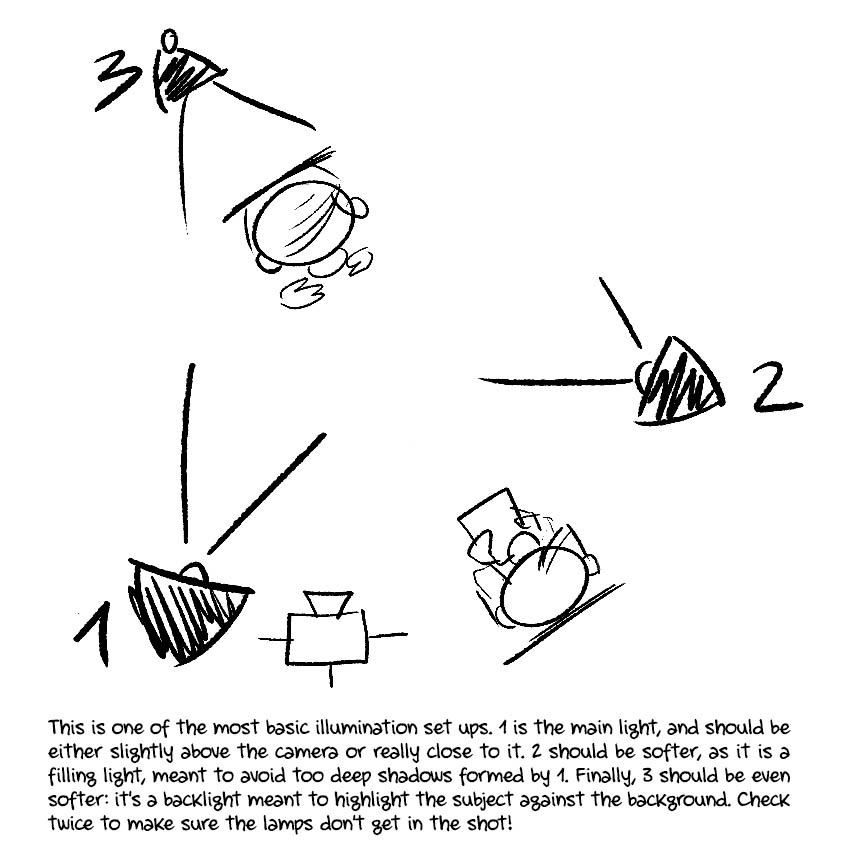
This 3-points lighting set is common for interviews; the second light can also be a reflector. If you can’t or won’t buy that many lamps, there’s another possibility: the Rembrandt lighting.
5. Edit the video
You wrote a general script following the advice we gave in our last post, then set the scene, filmed everything… Now you just have to edit it to make an interesting video. First, cut the dullest parts out, all the uhmmms, aaahhhs, and errrrs. You can (and should) rearrange everything to your taste to follow a particular reasoning or script. To add some visual variety, include some gameplay or artwork in the montage whenever it’s relevant – or, well, pretty much anything that is not a talking face. A neat trick is to film some close shots of the interviewee’s hands or face after you’ve finished the interview – you can put them wherever you want while keeping the voice, and when done right it will look as if you had two camerapeople filming everything.
Video editing is yet another art – conveying all the information with good pacing is not exactly easy, and that’s considering that you know at least the basics on how video editing software works. If you don’t, well, you’ll have to learn fast – there are cheap and even free online courses that can help you with that. But maybe the artists of your team do know how to edit video! Fortunately enough, you can experiment, arrange, and rearrange things as much as you want without showing anyone, so don’t hesitate to experiment until you get the results you want.
With all this, you are more or less ready to shoot a dev diary of your indie game. All these gear won’t cost you more than €150; you will need to experiment a lot to get things right the first time, but once you do, it will get easier and easier. Best of luck, and don’t hesitate to show us your dev diaries if you want some feedback!